部署docusaurus网站

docusarus是facebook一款开源静态网站生成平台,经过我的对比和测试,非常适合我建立网站.
部署Node.js
docusaurus 3.7需求Node.js的版本高于18,根据Download Node.js页面的指示进行安装。
# Download and install nvm:
curl -o- https://raw.githubusercontent.com/nvm-sh/nvm/v0.40.1/install.sh | bash

# in lieu of restarting the shell
\. "$HOME/.nvm/nvm.sh"

# Download and install Node.js:
nvm install 18

# Verify the Node.js version:
node -v # Should print "v18.20.7".
nvm current # Should print "v18.20.7".

# Verify npm version:
npm -v # Should print "10.8.2".
终端关闭后, 我想再次调用node程序,出现了zsh: command not found: npm, 经排查发现这是我mac电脑没有设置环境变量. 需要在~/.zshrc加入
export NVM_DIR="$([ -z "${XDG_CONFIG_HOME-}" ] && printf %s "${HOME}/.nvm" || printf %s "${XDG_CONFIG_HOME}/nvm")"
[ -s "$NVM_DIR/nvm.sh" ] && \. "$NVM_DIR/nvm.sh" # This loads nvm
初始化Docusaurus
Github
Github开启一个新的仓库:
- 仓库名:my-docusaurus
- 仓库设为Private.
将仓库Clone至本地, 打开终端
初始化的my-website内容和以下内容一致,如果不想安装Node.js环境,可以fork官方库,并把下面的文件夹拷贝到本地.
https://github.com/facebook/docusaurus/tree/main/examples/classic
本地部署
npx create-docusaurus@latest my-website classic
这时会创建一个“my-website”的文件夹,将这个文件夹的所有内容移动到my-docusaurus下.
下面开始这个网站
cd my-docusaurus
npm run start
这时你在本地,通过http://localhost:3000/即可访问你的网站了.
如果你希望在本地的其他电脑访问这个网站,使用以下命令:
npm run start -- --host 0.0.0.0
但是这个网站的内容还没有达到我们的期望,我们需要将这个网站完全变成自己的内容.
自定义Docusaurus
docusaurus.config.js
authors.yml
修改完了这些设置,我们在浏览器中看看我们的网站,已经初步达到我们的期望了.
下面我们将网站部署到互联网上.
Deploy to Cloudflare pages
Cloudflare作为全球性的CDN网络商,将网站部署在Cloudflare上,可以说非常方便.
![Set up build and deployment(https://pics.workapp.uk/i/2025/02/22/116r39-mz.png)
初始化vscode
docusaurus的内容是用md或者mdx格式编写的,我喜欢使用vscode作为我的markdown编辑器.
安装插件
- GitHub Theme
- IntelliCode
- Markdown PDF
- GitHub Markdown Preview
snippets
将以下code-snippet加入
	"blog template": {
		"prefix": "blog",
		"body": [
			"---",
			"title: $title",
			"tags:",
			"  - $1",
			"authors:",
			"  - beta",
			"---",
			"# $title""<!-- truncate -->",
			"write here",
			"## References",
			"".
		],
		"description": "blog template"
	},
	"docs template": {
		"prefix": "docs",
		"body": [
			"---",
			"tags:",
			"  - tag1",
			"---",
			"",
			"# $title",
			"write contents here""## How to",
			"",
			"## References",
			""
		],
		"description": "docs template"
	},
	"note": {
		"prefix": "note",
		"body": [
			":::note",
			"Some **content** with _Markdown_ `syntax`. Check [this `api`](#).",
			":::"
		],
		"description": "note"
	},
	"tip": {
		"prefix": "tip",
		"body": [
			":::tip",
			"Some **content** with _Markdown_ `syntax`. Check [this `api`](#).",
			":::"
		],
		"description": "tip"
	},
	"info": {
		"prefix": "info",
		"body": [
			":::info",
			"Some **content** with _Markdown_ `syntax`. Check [this `api`](#).",
			":::"
		],
		"description": "info"
	},
	"warning": {
		"prefix": "warning",
		"body": [
			":::warning",
			"Some **content** with _Markdown_ `syntax`. Check [this `api`](#).",
			":::"
		],
		"description": "warning"
	},
	"danger": {
		"prefix": "danger",
		"body": [
			":::danger",
			"Some **content** with _Markdown_ `syntax`. Check [this `api`](#).",
			":::"
		],
		"description": "danger"
	}
在工作区的setting.json中加入以下配置,实现在markdown自动调用snippets.
    "[markdown]": {
        "editor.quickSuggestions": {
            "other": true,
            "comments": true,
            "strings": true
        }
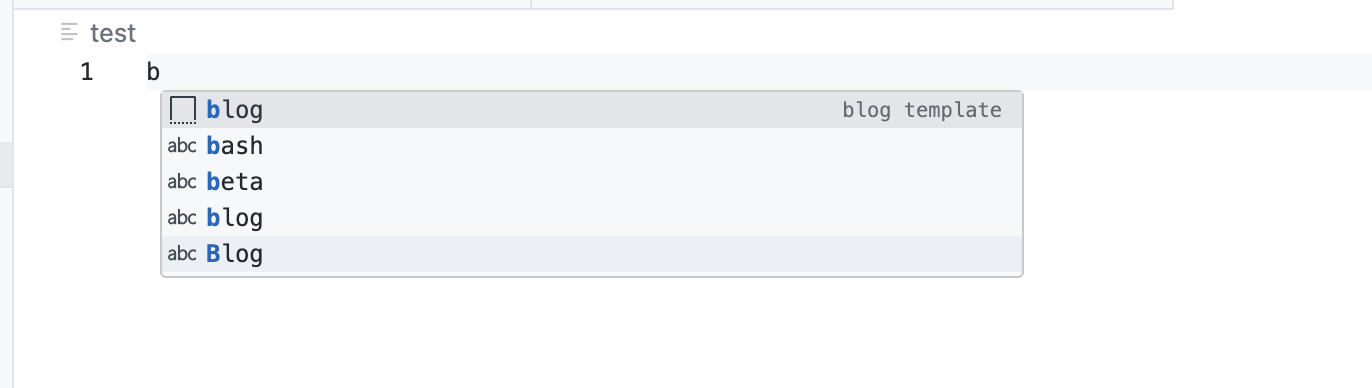
自动调用效果如下:
Reference
https://code.visualstudio.com/docs/languages/markdown#_snippets-for-markdown
https://jdocs.wiki/docusaurus-site/docs/multi-docs-and-versioning